Panoramic photography is a technique of photography, using specialized equipment or software, that captures images with elongated fields of view. It is sometimes known as wide format photography. This generally means it has an aspect ratio of 2:1 or larger, the image being at least twice as wide as it is tall.
An image showing a field close to what a human eye sees.
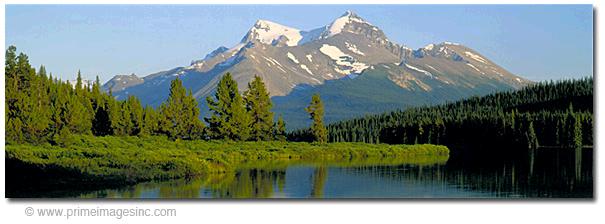
This mountain image that has a 3:1 aspect ratio ... meaning it is three times wider than it is tall. This is a "panoramic shaped" image.
Let's look at three different ways a panoramic shaped photograph can be created.
The first way is to take 5 or 6 side-by-side photographs of a scene (allowing for about a 20% overlap on each side) and assemble or "stitch" them together using a program like Adobe Lightroom (or with specialized software programs designed just for this purpose like PTGui Pro or Autopano Giga). This technique works quite well for scenes that don't have a lot of motion going on. The limiting factor for making a large 8x24 foot mural from a "stitched panoramic" would be the overall quality of camera and lens used to create the individual image components. A panoramic image assembled using five images created using a digital camera with a full frame sensor is going to have a lot more resolution and detail than a panoramic image stitched together with images from a small "point and shoot" camera or cropped sensor camera. The better the quality of the individual images ... the better the quality of the "stitched" panoramic for making a large photographic print or photo mural.
The second way is to use a specialized panoramic camera. Many of the images in my panorama collection were created using a Fuji professional 6x17cm panorama film camera. (and I still use a film camera on occasion)
A 6x17 panoramic film camera produces a film transparency that is 6x17cm ( 2 1/4 x 6 3/4 inches) in size. You can see below how a 6x17cm transparency compares in size with a standard 35mm transparency. We find that a 6x17cm transparency can be scanned to a 425 MB digital file before the film grain starts to become a factor. (that is slightly over 140 megapixels)
The third way is by simply cropping a standard 35mm format image into a panoramic shape utilizing a portion of the original photograph. You can see that the image on the right does crop well as a panoramic shaped photograph. And it would look great on your computer screen, on a web page, or as a 10x30 inch photograph on your wall. However, if we were to enlarge this cropped 35mm format image enough to print a 8x24 foot wall mural ... I think you would find the large mural would look soft and fuzzy. (this is a good quality for kittens, but not for large wall murals)
The problem is, the original 35mm format image is a considerably smaller digital file to begin with. Then we are only utilizing about 1/2 of that original digital file when we crop it into a panoramic shaped image. For example, if our original photograph was created using a 24 MP digital camera, we would actually be using less than a 12 MP digital file to make a 8x24 foot mural.
There are specialized software programs that can be used to enlarge or "rez up" digital files. However, there are limits to how many pixels can be added to an image before it becomes soft and pixelated.

Photographer David Lawrence with a Fuji 6x17cm film panorama camera
How do we create our panoramic images ?
I have used both the first and second techniques to create our panoramic images.
I like to photograph a series of six to twenty vertical digital images and later stitch them together back in the studio to create a high resolution digital panoramic image.
Especially for wide vistas where I may be able to create a MegaPan (an image with 5:1, 6:1 and even 8:1 image ratios).